
|  | IOLM DR-8-EIP Configuring PortsYou can use the IO-Link Master Library for EtherNet/IP and Modbus/TCP
for detailed configuration information or IOLM DR-8-EIP web page help system. You can use the following procedure to access the port configuration web pages. There are four port configuration pages: ![[Note]](images/note.gif) | | Note |
|---|
The IOLM DR-8-EIP works out of the box for ControlLogix PLCs. |
|
If necessary, open your browser and enter the IP address of the IOLM DR-8-EIP. The default IP address is: 192.168.1.250. Click Configuration | IO-LINK SETTINGS. Click the EDIT button for the port that you want to configure. Make appropriate selections for the IO-Link device that you will connect to that port.
You can use the help system if you require definitions or values for the options.
You can leave the Minimum Cycle Time set to the default value
and the IOLM DR-8-EIP negotiates with the IO-Link device for its minimum cycle time.
The IO-Link Diagnostics page displays the
Actual Cycle Time, which is the negotiated cycle time.
Click the SAVE button. Repeat for each port that requires configuration changes.
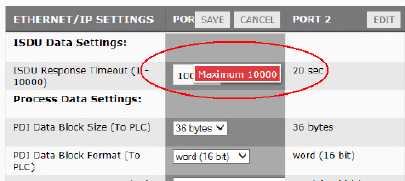
If necessary, open your browser and enter the IP address of the IOLM DR-8-EIP. The default IP address is: 192.168.1.250. Click Configuration and ETHERNET/IP SETTINGS. Click the EDIT button for the port that you want to configure. Make appropriate selections for the IO-Link device that you will connect to that port.
You can use the help system if you require definitions or values for the options. Scroll to the top of the page and click the SAVE button. Make sure that the port now displays the EDIT button.
If it displays the SAVE and CANCEL buttons,
that means that one of the parameters contains an incorrect value. If necessary, scroll down the page, make the needed corrections,
and click SAVE.
Repeat for each port that requires configuration changes
If necessary, open your browser and enter the IP address of the IOLM DR-8-EIP. The default IP address is: 192.168.1.250. Click Configuration and MODBUS/TCP SETTINGS. Click the EDIT button for the port that you want to configure. Make appropriate selections for the IO-Link device that you will connect to that port.
You can use the help system if you require definitions or values for the options. Scroll to the top of the page and click the SAVE button. Make sure that the port now displays the EDIT button.
If it displays the SAVE and CANCEL buttons,
that means that one of the parameters contains an incorrect value. If necessary,
scroll down the page, make the needed corrections, and click SAVE.
Use the appropriate procedure to configure digital I/O settings.
Digital Input (D1 Through D4)You can connect up to four digital input devices on the two DIO blocks.
If necessary, refer to Digital I/O port placement.
If you use D2 and D4 as digital input ports, you cannot connect digital output devices to D2 and D4. D1 and D3 can be used for digital input devices and D2 and D4 can be used for digital output devices, simultaneously.
Use this procedure to configure digital input on Ports D1 - D4.
Click Configuration | Digital I/O Settings. Click the EDIT button. Click Digital-Input as the Mode. If needed, make changes as needed to support the device you plan on connecting to the digital I/O ports. Click the SAVE button.
Digital Output (D2 and D4)You can connect up to two digital output devices on the two DIO blocks.
If necessary, refer to Digital I/O port placement.
Click Configuration | Digital I/O Settings. Click the EDIT button. Click Digital-Output as the Mode. If needed, make changes as needed to support the device you plan on connecting to the digital I/O ports. Click the SAVE button.
| |


