|  | RocketLinx MP1204-XT IP ConfigurationYou can use one of the following methods to configure the RocketLinx MP1204-XT IP address. ![[Note]](images/note.gif) | | Note |
|---|
You must have the MP1204-XT connected to your network to use the web page or telnet
and you may need to change your IP address on your system before you can communicate with the MP1204-XT. |
|
You can refer to the
RocketLinx MP1204-XT User Guide for more detailed information. Using the Web Interface to Configure the IP AddressYou must have the MP1204-XT connected to your network and you may need to
change your IP address on your system before you can log into the MP1204-XT with your browser and change the IP configuration.
| | Note |
|---|
The default IP address of the MP1204-XT is 192.168.250.250. |
|
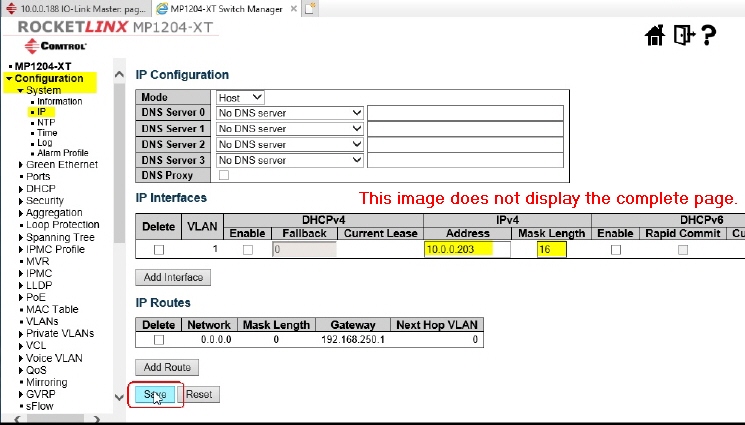
Open your browser and enter 192.168.250.250. Click Configuration | System | IP. Select the Mode (Host or a Router). In Host mode,
IP traffic between interfaces will not be routed. In Router mode traffic is routed between all interfaces.
| | Note |
|---|
Refer to the help or User Guide for more information about the options on this page. |
|
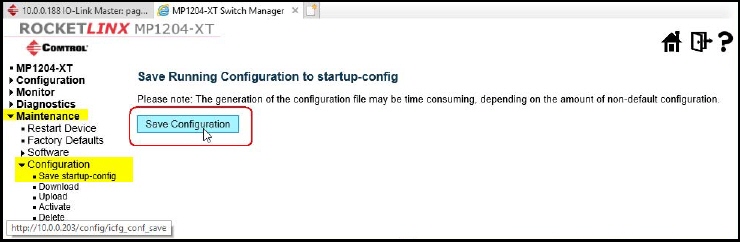
If applicable, select the appropriate DNS option. Enter the IP Address and Mask Length. If desired, add interfaces or IP routes. Click the Save button.
 Click Maintenance | Configuration | Save startup-config. Click the Save Configuration button.
Using Telnet to Configure the IP AddressYou must have the MP1204-XT connected to your network and you may need to
change your IP address on your system before you can telnet into the MP1204-XT to change the IP configuration.
| | Note |
|---|
The default IP address of the MP1204-XT is 192.168.250.250. |
|
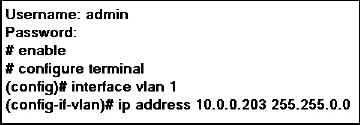
Open the command prompt and enter telnet 192.168.250.250. Enter admin as the Username and press the / key. Enter admin as the Password and press the Enter key. Enter enable and press the Enter key. Enter configure terminal and press the Enter key. Enter interface vlan 1 and press the Enter key. Enter ip address ###.###.###.### ###.###.###.###
(the IP address – space – subnet mask) and press the Enter key.
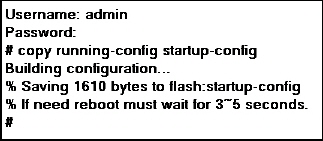
Move the Ethernet cable to the appropriate network. Close the telnet session. Save the new IP address to the flash, enter telnet and the new IP address. Enter the Username and Password. Enter copy running-config startup-config and press the Enter key. You can now open the MP1204-XT web interface to configure it to your environment.
Using the Console Port to Configure the IP AddressThe Console port supports local management by using a terminal emulator or a computer with
terminal emulation software, such as puTTY. The console port is located below the power connector.
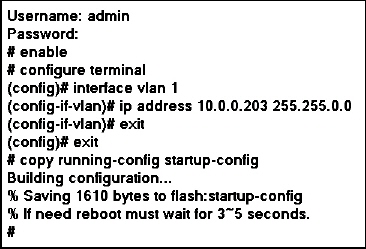
Start the terminal emulation software and configure the port as previously described. You may need to press the Enter key to get the Username prompt. Enter admin as the Username and press the Enter key. Enter admin as the Password and press the Enter key. Enter enable and press the Enter key. Enter configure terminal and press the Enter key. Enter interface vlan 1 and press the Enter key. Enter ip address ###.###.###.### ###.###.###.###
(the IP address – space – subnet mask) and press the Enter key. Enter exit and press the Enter key. Enter exit and press the Enter key. Enter copy running-config startup-config and press the Enter key.
| |